
Product Facts
- Product Name
- Power Drive Roller Door Opener - Residential Garage Door Automation
- Availability
- In Stock
- Condition
- New
- Category
- Home & Garden > Garage Door Openers
- Seller
- BnD Garage Doors
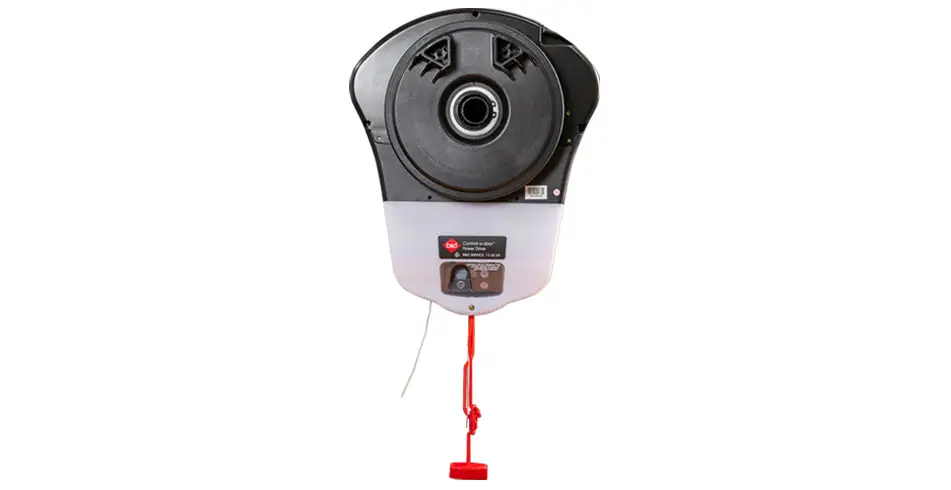
Power Drive Roller Door Opener - Residential Garage Door Automation
The Power Drive opener can seamlessly automate most residential roller doors, with a powerful, quiet motor, and soft start-and-stop functionality. Features advanced remote technology with Tri-Tran+ Remote Controls, automatic reverse safety functions, and a 600N motor for effortless operation.
Understanding Your Power Drive Roller Door Opener System
The B&D Power Drive roller door opener is a solid investment in your home's everyday convenience and security. Here's something most installers won't tell you: what you do in the first week matters more than you'd think. Take the time now to establish proper operating habits and document how your system performs, and you'll sidestep about 90% of the problems that trip up new owners. This first week really does set the tone—either you're looking at years of reliable service, or you're setting yourself up for recurring headaches that could have been avoided.
Your Power Drive combines mechanical automation with safety features that need verification, courtesy lighting you can tune to match how you actually use your garage, and remote controls that work better with some thought about placement. Unlike simpler garage door systems, the Power Drive's soft start and stop functionality means any performance changes creep up gradually. That's exactly why documenting how it performs in the first week helps you catch future issues before they turn into full-blown failures.
Complete Safety Feature Testing Sequence
Obstacle Detection Verification
Your Power Drive's soft start and stop mechanism includes integrated obstacle detection, and you'll want to test this under controlled conditions during your first week. This safety system prevents the door from closing on vehicles, pets, or people, but factory settings might not perfectly match your specific door weight and track setup.
Day 1-2 Testing Protocol: Grab a 40mm thick cardboard box and place it flat on your garage floor, centred where the door travels. Start closing the door from fully open using your remote control. The door should reverse direction within 2 seconds of touching the box without crushing it. If the box compresses more than 10mm before reversal kicks in, the sensitivity needs professional adjustment—this means the obstacle detection isn't sufficient for child or pet safety.
Run this test three times with the box in different spots: centred, 200mm from the left track, and 200mm from the right track. If you notice the reversal behaves differently across these positions, you've got track alignment issues that will get worse over time. Write down which positions trigger proper reversal and which don't—this baseline becomes really valuable if sensitivity changes months down the track.
Critical Mistake to Avoid: Never test obstacle detection with your hand or foot. The Power Drive generates enough force to cause injury before reversal kicks in. New owners make this error all the time, assuming they can "feel" when the system activates. The soft start feature means force builds gradually, which creates a false sense of safety.
Force Limit Calibration Check
Your Power Drive's smooth operation depends on correctly calibrated force limits that prevent the motor from over-stressing the door mechanism. During installation, technicians set these limits, but environmental factors during your first week can reveal calibration problems.
Day 3-4 Testing Protocol: Run the door through five complete open-close cycles while standing inside the garage, listening for motor strain. Your Power Drive should maintain consistent sound throughout each cycle—any grinding, clicking, or motor speed variation means force limit miscalibration. Note exactly where in the door's travel these sound changes occur.
Pay particular attention to the final 300mm of door travel in both directions. The soft stop feature should engage smoothly without the door "bouncing" or needing multiple motor pulses to reach fully closed. A single bounce is acceptable calibration; multiple bounces or failure to fully close means you need professional recalibration straight away.
Performance Documentation: Record the time required for complete door opening (floor to fully open) and complete closing (fully open to floor). Write these down in whole seconds. For standard residential roller doors, the Power Drive typically completes each cycle in 12–18 seconds. Times outside this range suggest force limit issues or mechanical resistance that needs attention. This baseline timing becomes your reference for detecting motor changes over your system's lifespan.
Courtesy Light Timing Optimisation
Understanding the Automatic Courtesy Light System
Your Power Drive's automatic courtesy light activates with each door operation, providing illumination for safe garage entry and exit. Factory default timing keeps this light active for 3–5 minutes after door movement stops, but this rarely matches real-world usage patterns and leads to two common complaints from new owners: the light switches off too early during unloading, or it runs too long wasting electricity.
Day 2-3 Usage Observation: Track your actual garage usage patterns across different scenarios. Time how long you need illumination for these common activities:
- Entering garage and walking to interior door (typically 15–30 seconds)
- Unloading groceries from vehicle (typically 2–4 minutes)
- Retrieving items from garage storage (typically 1–3 minutes)
- Parking and exiting vehicle with children (typically 1–2 minutes)
Your longest routine task determines the minimum acceptable courtesy light duration. If your Power Drive's current timing shuts off before you complete your longest task, you'll develop the risky habit of working in darkness or leaving the door partially open for light—both significant security risks.
Timing Adjustment Strategy
Most Power Drive models let you adjust courtesy light timing through the control unit mounted near the door header. The control unit features a small adjustment dial or button sequence (check your specific installation manual) that modifies light duration in 30-second increments.
Optimisation Process: Set the timing 30 seconds longer than your longest observed task. This buffer prevents the frustration of darkness while keeping wasted runtime minimal. For households with young children or mobility limitations, add an additional 60-second buffer to accommodate slower movement.
Common New Owner Mistake: Setting courtesy light timing too short to "save energy." Your Power Drive's LED or efficient bulb uses minimal electricity—approximately $2–4 annually even with extended timing. The safety and convenience value of adequate lighting far exceeds this small cost. On the flip side, setting timing excessively long (10+ minutes) doesn't help anyone and may mask security issues by leaving the garage illuminated when no one's there.
Light Bulb Compatibility Verification
During your first week, verify the courtesy light bulb type matches your climate conditions and usage frequency. The Power Drive accommodates standard bulbs, but extreme temperature environments require specific bulb types.
Climate-Specific Requirements: Garages experiencing temperatures below 0°C or above 40°C require bulbs rated for extreme temperature operation. Standard bulbs fail early in these conditions—often within the first week of temperature extremes. If your courtesy light flickers, dims unexpectedly, or fails during your first week, bulb incompatibility is the likely cause, not a Power Drive malfunction.
Test the bulb during your coldest expected garage temperature (early morning in winter climates) and hottest expected temperature (mid-afternoon in summer climates). Consistent illumination across these extremes confirms bulb compatibility.
Remote Storage and Backup Planning
Primary Remote Placement Strategy
Your Power Drive includes remote controls that need strategic placement to prevent the three most common problems new owners face: vehicle break-in theft, accidental activation, and loss during routine activities.
Vehicle Visor Mounting – Critical Risk: Storing your primary remote on the vehicle sun visor creates the highest theft risk. Thieves target visible garage door remotes because they provide both vehicle and home access. During your first week, establish a concealed mounting location within the vehicle that remains accessible to you as the driver but invisible from outside.
Better locations include:
- Centre console storage compartment (if lockable)
- Glove box secured with your vehicle's locking system
- Custom mounting bracket on the driver's side lower dashboard
- Steering column area behind the wheel (requires custom mounting)
Day 1 Task: Test your chosen mounting location by simulating rushed departure scenarios. You should be able to locate and activate the remote without looking, using only muscle memory. If you need to search for the remote, the location isn't working and will cause frustration during daily use.
Backup Remote Programming and Storage
The Power Drive system allows multiple remote programming, but new owners often fail to programme and properly store backup remotes during the first week—a mistake that becomes critical when primary remotes fail or get lost.
Day 4-5 Programming Protocol: Programme at least one backup remote following the manufacturer's synchronisation sequence. This typically involves pressing the control unit's programming button and then the remote button within a specific timeframe. Test the backup remote's range from multiple positions around your property to verify successful programming.
Strategic Backup Storage: Store your programmed backup remote in a location that's:
- Inside your home (not in the garage or vehicle)
- Accessible to all household members who may need emergency access
- Protected from temperature extremes that degrade battery life
- Documented in your household emergency information
Common secure locations include a kitchen drawer designated for keys, a bedroom nightstand, or a home office desk drawer. Avoid storing backup remotes in obvious locations like key hooks near doors—these are the first places searched during break-ins.
Remote Battery Baseline Documentation
New Power Drive remotes ship with factory-installed batteries that have unknown remaining lifespan. During your first week, document battery installation dates to establish replacement schedules.
Battery Life Expectation: Power Drive remotes typically achieve 12–24 months of battery life under normal usage (2–4 door activations daily). However, extreme temperature exposure or manufacturing date uncertainty means first-week battery documentation prevents future dead-battery surprises.
Day 6-7 Task: Apply a small label to each remote indicating the current date. When battery failure occurs, this date reveals actual battery lifespan for your specific usage pattern, allowing you to establish proactive replacement schedules. Replace batteries in all remotes at the same time when the first one fails—this prevents the frustration of sequential failures across multiple remotes.
Baseline Performance Documentation
Creating Your Door Performance Reference
Your Power Drive's smooth operation depends on mechanical components that degrade gradually over months and years. Without first-week baseline documentation, you can't distinguish normal wear from emerging failures until a complete breakdown occurs.
Comprehensive Documentation Checklist:
Operational Sound Recording: Use your smartphone to record 30-second audio during door opening and closing. This audio baseline captures the normal sound signature of your specific installation—motor hum, roller noise, track vibration. When unusual sounds develop months later, comparison to this baseline immediately identifies whether the sound is normal operation or developing failure.
Door Speed Measurement: Using a stopwatch or smartphone timer, measure door travel time from floor to fully open, and fully open to floor. Record these times in whole seconds. Variation greater than 2 seconds from baseline means motor degradation or mechanical resistance requiring attention.
Visual Alignment Photography: Take photographs of the door in the fully closed position from inside the garage, showing the door's alignment with the floor and side tracks. Photograph both sides of the door from a position 2 metres back. These images document initial alignment—critical for identifying track shifting or foundation settlement that causes binding and motor stress.
Remote Range Testing: Mark the furthest distance from which each remote successfully activates the door. Test from your driveway, street, and any common approach angles. Document these distances. Range reduction over time means antenna issues or control unit degradation requiring attention before complete failure occurs.
Environmental Condition Recording
Your Power Drive's performance varies with temperature, humidity, and seasonal changes. First-week documentation during specific weather conditions provides context for future performance variations.
Day 7 Environmental Baseline: Record current weather conditions when conducting performance documentation:
- Outside temperature
- Approximate garage interior temperature
- Recent rainfall or humidity conditions
- Season (affects metal expansion and lubrication viscosity)
When door performance changes months later, comparing current environmental conditions to your baseline reveals whether the change is normal seasonal variation or actual degradation. For example, slightly slower door operation during winter cold is normal; the same slowdown during summer heat means motor issues.
Maintenance Schedule Establishment
Your Power Drive requires minimal maintenance, but establishing a schedule during your first week prevents the common new owner mistake of reactive-only maintenance that allows small issues to become expensive failures.
Recommended First-Year Schedule:
- Month 3: Visual inspection of tracks, rollers, and mounting brackets for looseness or wear
- Month 6: Lubrication of moving parts with manufacturer-approved lubricant
- Month 9: Repeat safety feature testing sequence
- Month 12: Professional inspection and adjustment
Day 7 Calendar Integration: Enter these maintenance dates into your household calendar system straight away. New owners who delay this task invariably forget maintenance until problems develop. Your Power Drive's reliable operation creates a false sense that maintenance isn't necessary—until accumulated wear causes sudden failure.
Critical First-Week Mistakes to Avoid
Premature Smartphone Control Integration
Your Power Drive includes Smartphone Control readiness, but new owners often attempt integration during the first week before establishing baseline manual operation understanding. This creates confusion when troubleshooting issues—you can't determine whether problems come from the Power Drive system, the smart integration, or network connectivity.
Recommended Approach: Operate your Power Drive exclusively through physical remotes for the first week. Complete all safety testing, performance documentation, and baseline establishment using only the standard remote controls. After documenting normal operation, then add smartphone integration as an additional control layer. This sequence means you understand the core system before adding complexity.
Ignoring Initial Performance Anomalies
Your Power Drive's soft start and stop feature masks developing issues that would be obvious in simpler garage door systems. New owners often dismiss initial performance anomalies as "break-in period" behaviour rather than installation issues requiring immediate correction.
Red Flags Requiring Immediate Professional Attention:
- Door reverses during closing without obstacle present
- Motor runs but door doesn't move
- Grinding or clicking sounds during any portion of travel
- Door fails to fully close or fully open consistently
- Courtesy light flickers or fails to activate
- Remote requires multiple button presses for activation
These symptoms during the first week mean installation errors or component defects covered under warranty. Delaying professional inspection converts warranty-covered repairs into out-of-pocket expenses after the warranty period expires.
Inadequate User Training for Household Members
Your Power Drive system works for all household members, but new owners often fail to train other users during the first week. This leads to improper operation, safety feature defeats, and emergency access problems.
Day 5-6 Training Protocol: Conduct hands-on training with every household member who will operate the door. Training must include:
- Proper remote operation technique (single button press, wait for complete cycle)
- Visual confirmation that the door path is clear before activation
- Emergency manual release location and operation
- What to do if the door stops mid-cycle
- Who to contact for malfunctions (not attempting DIY repairs)
Children old enough to operate remotes require additional training on safety—particularly understanding that the door isn't a toy and that obstacle detection is a backup safety feature, not permission to play in the door's path.
Failure to Document Installer Contact Information
Power Drive installations include warranty coverage and installer support, but new owners often discard installation documentation or fail to record installer contact information in accessible locations.
Day 1 Critical Task: Create a "Garage Door System" information sheet containing:
- Installer company name, phone number, and emergency contact
- Installation date and warranty expiration date
- Power Drive model number and serial number
- Control unit location and any access codes
- Remote control serial numbers
Store this information in at least two locations: a physical copy in your home filing system and a digital copy in your phone or email. When problems occur—especially outside business hours—this information enables rapid contact with qualified service providers rather than attempting risky DIY repairs or hiring unqualified technicians.
Emergency Preparedness During Week One
Manual Release System Familiarisation
Your Power Drive includes a manual release mechanism that allows door operation during power outages or system failures. New owners must locate and test this system during the first week, not during an actual emergency when stress impairs learning.
Day 3 Manual Release Testing: Locate the manual release handle (typically a red cord hanging from the opener rail). With the door in the fully closed position and the opener disconnected from power, pull the release handle. The door should disengage from the opener and become manually operable.
Critical Safety Note: Only test manual release with the door fully closed. Releasing the mechanism with the door partially or fully open can cause the door to fall rapidly if springs aren't properly balanced—creating injury risk and potential door damage.
After testing manual release, verify you can re-engage the automatic system by returning the release lever to its normal position and cycling the door with the remote. If re-engagement doesn't occur automatically, consult your installation manual for the specific re-engagement procedure—this varies by Power Drive model.
Power Outage Operation Planning
Your Power Drive requires electrical power for operation, creating potential access problems during outages. First-week planning prevents the common scenario where owners can't enter or exit their garage during power failures.
Alternative Access Strategy: Identify and test your alternative garage access method:
- Interior door from house to garage (verify you have keys if door locks)
- Side or rear garage door (verify operational and you have keys)
- Manual release operation (if vehicle isn't parked inside blocking door operation)
If your only garage access requires Power Drive operation and you have no alternative entry, consider installing a battery backup system (available as an optional accessory) or establishing a household policy of parking vehicles outside during severe weather that may cause extended outages.
References
- B&D Doors Australia - Power Drive Product Documentation
- Garage Door Safety Standards - AS/NZS 4428
- Based on manufacturer specifications provided in product documentation
Frequently Asked Questions
What product is this FAQ about: B&D Power Drive roller door opener
What type of product is the Power Drive: Automated garage roller door opener system
Does it include obstacle detection: Yes
Does it have soft start functionality: Yes
Does it have soft stop functionality: Yes
Does it include courtesy lighting: Yes
Does it come with remote controls: Yes
Is it compatible with smartphone control: Yes
Does it require electrical power: Yes
What should be done in the first week: Establish operating habits and document performance
What percentage of common issues can first-week documentation prevent: Around 90%
How long does a complete door cycle typically take: 12–18 seconds
What thickness cardboard box should be used for obstacle testing: 40mm thick
How quickly should the door reverse after contacting an obstacle: Within 2 seconds
What is the maximum acceptable box compression during obstacle testing: 10mm
Should you test obstacle detection with your hand: No, never
Should you test obstacle detection with your foot: No, never
Can the Power Drive cause injury during obstacle testing: Yes
How many times should you test obstacle detection: Three times
Where should the test box be placed first: Centred in the door's path
Where should the test box be placed second: 200mm from the left track
Where should the test box be placed third: 200mm from the right track
What does the door do when it detects an obstacle: Reverses direction
How many complete open-close cycles should be tested for force limits: Five cycles
What indicates force limit miscalibration: Grinding, clicking, or motor speed variation
How many bounces indicate acceptable calibration: A single bounce
How many bounces require professional recalibration: Multiple bounces
What is the factory default courtesy light timing: 3–5 minutes
Can courtesy light timing be adjusted: Yes
What increment can courtesy light timing be adjusted by: 30-second increments
How much longer than your longest task should light timing be set: 30 seconds
What is the annual electricity cost of extended courtesy light timing: Approximately $2–4 AUD
What temperature requires extreme-rated bulbs (cold): Below 0°C
What temperature requires extreme-rated bulbs (hot): Above 40°C
Is storing the remote on the sun visor recommended: No, highest theft risk
Where should the primary remote be stored in vehicle: Concealed but accessible location
How many backup remotes should be programmed: At least one
Where should backup remotes be stored: Inside your home
What is typical remote battery life: 12–24 months
How many door activations per day is normal usage: 2–4 activations
Should all remote batteries be replaced at once: Yes
How long should audio recording of door operation be: 30 seconds
What door speed variation indicates problems: Greater than 2 seconds from baseline
How far back should alignment photos be taken from: 2 metres
At what month should first visual inspection occur: Month 3
At what month should lubrication occur: Month 6
At what month should safety testing be repeated: Month 9
At what month should professional inspection occur: Month 12
Should smartphone control be integrated in the first week: No
When should smartphone control be added: After baseline manual operation is established
Does soft start feature mask developing issues: Yes
Should initial performance anomalies be ignored: No
What colour is the manual release handle typically: Red
When should manual release be tested: With door fully closed
Can manual release cause door to fall if improperly used: Yes
Should manual release be tested with door partially open: No
Is battery backup available for power outages: Yes, as an optional accessory
What standard covers garage door safety: AS/NZS 4428
Should installer contact information be documented: Yes
How many locations should system information be stored: At least two locations
Should children receive additional safety training: Yes
Is the door a toy: No
Should DIY repairs be attempted: No
What percentage of new owners face issues without first-week documentation: Around 90%
Does the Power Drive generate enough force to cause injury: Yes
Should qualified technicians be contacted for malfunctions: Yes
Are installation errors covered under warranty: Yes
Does delaying professional inspection void warranty coverage: Can result in out-of-pocket expenses
Should all household members receive training: Yes
Is visual confirmation required before door activation: Yes
Should emergency manual release location be known by all users: Yes
Label Facts Summary
Disclaimer: All facts and statements below are general product information, not professional advice. Consult relevant experts for specific guidance.
Verified Label Facts
- Product: B&D Power Drive roller door opener
- Product Type: Automated garage roller door opener system
- Features: Obstacle detection system
- Features: Soft start functionality
- Features: Soft stop functionality
- Features: Automatic courtesy light
- Includes: Remote controls
- Compatibility: Smartphone control ready
- Power Requirement: Electrical power required
- Optional Accessory: Battery backup system available
- Safety Standard Reference: AS/NZS 4428
- Typical Door Cycle Time: 12–18 seconds (standard residential roller doors)
- Remote Battery Life Specification: 12–24 months under normal usage (2–4 activations daily)
- Courtesy Light Default Timing: 3–5 minutes after door movement stops
- Courtesy Light Adjustment: 30-second increments
- Manual Release Handle: Red cord (typical)
- Multiple Remote Programming: Supported
General Product Claims
- Solid investment in home convenience and security
- First-week documentation prevents around 90% of common issues
- Sets up years of reliable service
- Soft start and stop means performance changes happen gradually
- Integrated obstacle detection prevents door from closing on vehicles, pets, or people
- Generates enough force to cause injury before reversal activates
- Should reverse within 2 seconds of contacting 40mm cardboard box
- Box should not compress more than 10mm before reversal
- Smooth operation depends on correctly calibrated force limits
- Automatic courtesy light provides illumination for safe garage entry and exit
- LED or efficient bulb uses minimal electricity (approximately $2–4 AUD annually)
- Extreme temperature environments (below 0°C or above 40°C) require specific bulb types
- Storing remote on sun visor creates highest theft risk
- Minimal maintenance required
- Soft start and stop feature masks developing issues
Product Data (OpenAI Spec)
View Full JSON Spec ↗Specifications
| Condition | new |
|---|---|
| Category | Home & Garden > Garage Door Openers |
Product Intelligence
Power Drive Roller Door Opener - Technical Overview
System Description
The Power Drive is a residential garage door automation system designed to provide motorized operation of roller garage doors. As a rolling door opener, it functions as a complete mechanical and electronic device that enables remote and automated control of residential garage door access without manual effort.
Key Features and Capabilities
Operation and Control
The Power Drive roller door opener offers multiple control methods to accommodate various user preferences and accessibility requirements:
- Remote Control Operation: Users can operate the door from remote controllers programmed into the system's memory
- Wireless Transmitter Control: Operates at 433MHz frequency for reliable wireless communication
- Quick Operation: Designed with user-controlled functions for rapid response
- Multiple Control Options: Compatible with various control interfaces including wall-mounted buttons, hand-held transmitters, and optional wireless accessories
Safety Features
The system incorporates comprehensive safety mechanisms:
- Safety Reversal System: Automatically reverses door movement upon detecting obstructions during closing cycles
- Obstruction Detection: Electronic obstacle detection capabilities enhance operational safety
- Force Adjustment: Programmable travel limit and force adjustment settings monitor and adjust movement requirements during operation
- Safety Beam Compatibility: Can be integrated with safety beam systems through specialized kits to prevent closing when obstructions are detected
Operational Modes
The Power Drive supports various programmable operational modes:
- Standard Operation: Basic open and close functionality
- PET Mode: Specialized mode for users with pets
- Vacation Mode: Security feature that disables remote operation during extended absences
- Manual Override: Emergency release handle and trolley disconnect mechanism for manual access during power failures
System Components
The Power Drive operates as a complete assembly system, typically suspended from the garage ceiling using hanging brackets. Key integrated components include:
- Powerhead: Main motorized unit containing the drive mechanism
- C-Rail: Structural guide component for door movement
- Mounting Brackets: Secure installation hardware
- Receiver Terminals: Equipped with antenna for wireless communication
- Chain and Sprocket Mechanism: With integrated trolley assembly controlling door movement cycles
- Tracks, Wheels, and Cable Drum: Mechanical components requiring regular preventative servicing
Control Features
The Power Drive provides sophisticated control capabilities:
- Transmitter Memory: Can learn and store codes from remote control transmitters
- Programmable Settings: Adjustable travel limits and force settings
- LED Indicators: Status lights providing operational feedback
- Courtesy Light: Illumination during door operation
- Auxiliary Output: Capability to activate external devices
Installation Requirements
For optimal functionality, the Power Drive requires:
- Proper installation on a well-balanced garage door
- Secure fastening to structural garage supports
- Positioning at the ceiling or wall level with the top of the motor unit
- Protection from water and environmental hazards
- Regular professional service and periodic inspections
Power Specifications
The system requires:
- Mains power connection for standard operation
- Optional battery backup capability for emergency operation during power failures
- 24V load voltage operating capability
Maintenance and Warranty
The Power Drive contains no user-serviceable parts and requires:
- Regular professional service for optimal performance
- Periodic inspections to maintain functionality
- Adherence to operational safety instructions for warranty compliance
- Authorized dealer service calls for repairs and adjustments
Warranty coverage is contingent on proper maintenance practices and professional service adherence.
References
- [1] sdo-2-v2-instruction-manualv-101.pdf
- [3] easylifter-rdo-post-2006.pdf
- [7] ata-rolling-door-openers-trade-reference-guide_low-res.pdf