
Product Facts
- Product Name
- Roll-A-Pro Opener - Roller Door Automation System
- Availability
- In Stock
- Condition
- New
- Category
- Home & Garden > Garage Door Openers
- Seller
- BnD Garage Doors
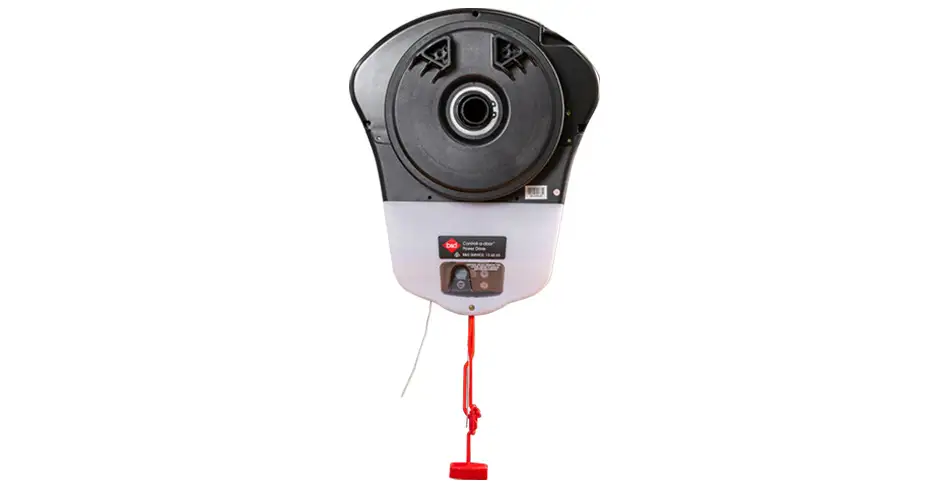
Roll-A-Pro Opener - Roller Door Automation System
The B&D Roll-A-Pro door opener sets the standard for reliable roller garage door automation. It is affordable and offers smooth and seamless operation. Features a 500N motor designed to lift most residential roller doors, automatic courtesy light, and soft start-and-stop to reduce door stress. Includes automatic reverse and automatic backdrive safety features.
B&D Roll-A-Pro Opener Product Guide
Owner Operation, Remotes, Safety, Troubleshooting & Maintenance (Aligned to B&D Roll‑A‑Pro product page + official Roll‑A‑Pro/Power Drive guides)
Guide Summary
Product: B&D Roll‑A‑Pro® Opener (Roller Door Opener)
Brand: B&D (B&D Australia)
Category: Residential roller door automation
Primary use: Automates compatible residential roller garage doors with secure remote control access and built‑in safety functions.
What it is:
Roll‑A‑Pro is an affordable, reliable roller door opener designed to lift most residential roller doors. It features a 500N motor, soft start and soft stop (to reduce door stress and noise), and an automatic LED courtesy light to illuminate your garage when operating.
Core safety & security features (standard):
- Automatic Reverse: if the closing door meets an obstruction, the opener stops and reverses.
- Automatic Backdrive: helps resist forced entry by driving back down if the door is being forced open.
- Secure coding technology: Tri‑Tran+ technology with non‑linear encryption and over 100 billion random code combinations.
Quick Facts
- Best for: Homes wanting a dependable, cost‑effective roller door opener with secure remote access
- Motor / peak force: 500N (short‑term peak force)
- Typical door suitability (guide limits): Up to 110 kg roller door weight and up to 15.0 m² door area (door must be well balanced and operate smoothly by hand)
- Power supply: 230–240V, 50Hz
- Courtesy light: LED
- Remote system: Tri‑Tran+ technology (secure encrypted coding)
- Remote capacity: Up to 8 Tri‑Tran+ 4‑button transmitters (Roll‑A‑Pro)
- Transmitter battery type: CR2032 (3V)
What’s Included (Typical Roll‑A‑Pro Kit Contents)
Your Roll‑A‑Pro kit typically includes:
- 1 × Roll‑A‑Pro drive unit (RDO‑1V3)
- 2 × Locking Bar Covers
- 3 × TB‑7 transmitters (handheld remotes)
- 1 × Wall / visor clip (for a remote)
- 1 × Collar kit
- 1 × Weight bar
- Fasteners and accessory hardware required for installation (supplied for professional installation)
Note: Installation instructions are written for professional installers. B&D recommends using a professional installer due to door weight, stored spring tension, and safety setup requirements.
Recommended Doors
Roll‑A‑Pro is designed for residential roller doors, and B&D commonly pairs it with:
- B&D Roll‑A‑Door® (B&D’s iconic roller door design)
- B&D Rollmasta® (a cost‑effective made‑to‑measure roller door solution)
Warranty Overview (Roll‑A‑Pro)
- When purchased with a genuine B&D garage door and opener together: eligible for B&D’s 10‑year Total Confidence Warranty (door + opener designed and tested to work together).
- When purchased alone: Roll‑A‑Pro has a 5‑year warranty (or 10,000 cycles).
Always follow servicing and maintenance requirements to maintain warranty eligibility.
Safety First
Garage doors are often the largest and heaviest moving part of a home. Read and apply these safety points:
Safe operation rules
- Keep the door in sight while it is moving.
- Keep hands, clothing, and objects clear of the moving door and guides.
- Never walk or drive under a moving door.
- Keep transmitters away from children; do not allow children to play with remotes.
Manual release warning
- If you use the manual release while the door is open, the door may fall rapidly if springs are weak/broken or the door is not properly balanced.
- Do not disengage the opener to manual operation with children, people, or vehicles within the doorway.
Battery hazard warning (CR2032 coin cell)
- Coin cell batteries are hazardous. Keep out of reach of children.
- If swallowed or placed inside the body, serious injury can occur rapidly. Seek immediate medical attention if suspected.
Professional installation recommended
B&D recommends professional installation of doors and openers because garage doors are heavy and can cause injury or property damage if mishandled.
Extra safety upgrades (recommended)
Even though the opener includes built‑in safety functions, B&D recommends additional protection for families:
- Safety Beams (photo electric beams): stop and reverse the door if an obstruction is detected during closing.
- Entry Keypad: PIN access without needing to hand out keys/remotes (useful for families).
- Optional accessories (where fitted): Battery Back‑Up (for operation during power outage) and Smart phone control (requires Smart Hub).
Important: The Smart Hub must be connected to power at all times. Do not disconnect power after setup.
Understanding the Opener Controls and Indicators
The opener has a control panel under the controls cover. Key items include:
Buttons
- OPERATE: Opens / stops / closes the door
- LIMIT SET: Used during setup (installer)
- FORCE MARGIN SET and + button: Used during setup/adjustments (installer)
Indicator LEDs
- CODE SET LED (red): flashes when a code is being stored or when a transmitter button is pressed
- CLOSE LIMIT LED (red): flashes while door is closing and stays on when close limit is reached
- OPEN LIMIT LED (green): flashes while door is opening and stays on when open limit is reached
- SERVICE LED (yellow): indicates when the opener requires service or repairs
CODE SET and MINUS (–)
- Used for storing or erasing transmitter buttons for door operation and for programming certain transmitter functions.
Door Status Indicators (What the LEDs Mean)
The opener uses the OPEN (green) and CLOSE (red) LEDs, plus a beeper in certain conditions, to indicate status:
- Door open: OPEN LED on
- Door closed: CLOSE LED on
- Door opening: OPEN LED flashing
- Door closing: CLOSE LED flashing
- Door travel stopped: OPEN and CLOSE LEDs flashing
- Door obstructed while opening: OPEN LED flashing + beeps while moving
- Door obstructed while closing: CLOSE LED flashing + beeps while moving
- Opener overloaded: OPEN and CLOSE LEDs alternating flashes
- Mains power interrupted: rapid flashes
Everyday Operation
Using the transmitter (remote)
- Press the programmed transmitter button until the door begins to move (usually about 2 seconds).
- If you press the transmitter while the door is moving, the door will stop.
- Press again and the door will move in the opposite direction.
- Before driving in or out, confirm the door is fully open or fully closed.
In a vehicle: Aim the transmitter through your windscreen for best results.
Courtesy light
The opener includes an automatic LED courtesy light to illuminate the garage during operation. (You can also program a transmitter button to control the courtesy light—see Advanced transmitter functions.)
Manual Door Operation (Disengage / Re‑engage)
Manual operation is used during power failure or if the opener needs to be disengaged.
To disengage the opener (manual mode)
Recommended: disengage with the door closed.
- Pull the manual release handle until you hear a click.
- You can now manually operate the door.
Important: When manually disengaged, the door is no longer locked. To lock the door manually, re‑engage the opener after the door is closed.
To re‑engage the opener
- Pull the manual release handle until you hear a click.
- Press the transmitter (or OPERATE button) to test.
Safety note: The manual release should be easy to operate; no more than 20 kg of force should be required. If excessive force is needed, contact your dealer.
Coding (Programming) a Transmitter (Remote)
Your opener will only work with transmitters that are programmed into its memory.
- Maximum programmed transmitters: up to 8 (Roll‑A‑Pro)
Method A: Coding a remote from the opener
- Ensure power is on.
- Remove the opener controls cover to access the buttons.
- On the opener, press and release the CODE SET (–) button.
- On the transmitter, press and hold the button for 3 seconds, release, then press and hold the same button for 3 seconds, and release.
- Test the remote button to confirm operation.
- Refit the controls cover.
Method B: Remotely coding (duplicating) a remote (requires a pre‑coded remote in range)
This method is used when you already have a working, pre‑coded remote and you’re in range of the opener.
- Take a pre‑coded transmitter and press the button you want to duplicate.
- Take the new transmitter and, using a pen, hold the middle button through the coding hole for 2 seconds.
- The opener will flash and beep.
- On the new transmitter, press and hold the desired button for 3 seconds, release, then press and hold for 3 seconds and release.
- When coding is successful, the opener stops flashing/beeping.
- Test the new remote.
When remote coding may be disabled
Remote code setting can be disabled when:
- the opener is powered by battery back‑up
- the service indicator is active
- the door is indicating it was prevented from closing because a P.E. (Safety) beam is blocked
Erasing ALL Transmitter Codes (Remove all remotes)
Use this if a remote is lost/stolen or if you want to wipe all programmed transmitters and start again.
- Remove the opener controls cover.
- Press and hold the CODE SET button for 6 seconds, then release.
- The LED will flash rapidly.
- All stored transmitter codes are deleted.
- Test by pressing a remote (it should no longer operate).
- Refit the controls cover.
- Re‑code only the remotes you want to keep.
Remote Battery Management (TB‑7 Transmitter)
Battery type
- 1 × CR2032 (3V) coin cell battery
Check battery status (using the transmitter LED)
Press and hold a transmitter button and observe the indicator light:
- Solid light: Battery OK
- Flashing light: Replace battery
- No light: Replace battery
Changing the battery
- Use a screwdriver to remove the screws and open the transmitter case.
- Use a non‑metallic object to push the battery out.
- Insert a new CR2032 (3V) battery.
- Close the case securely and test operation.
Safety warning: Keep coin cell batteries away from children and seek immediate medical attention if ingestion is suspected.
Smart Phone Control (Optional – Requires Smart Hub)
Smart phone control works via your home’s Wi‑Fi network and a Smart Hub accessory.
Important warning
This system allows operation when you are not in line‑of‑sight of the door. The door may operate unexpectedly. Do not allow anything to remain in or near the path of the door.
Before you start
- Download the B&D App to your phone
- Ensure travel limits are set prior to connecting to Wi‑Fi
- Ensure your home Wi‑Fi router is within range of the opener
Setup overview
- Connect the Smart Hub to power.
- On your phone, go to Wi‑Fi settings and select the Smart Hub network (shown as B&D000000).
- Open the B&D App and tap START.
- Set up a new Smart Hub in the app and follow the prompts.
- When “Smart Hub connect” appears, confirm the Wi‑Fi network is B&D000000, then continue following the app instructions.
- When complete, test the opener through the app.
Advanced Transmitter Functions (Optional Programming)
These functions allow a transmitter button to control features beyond standard door operation. They are useful, but not required for normal use.
1) Coding a transmitter button for Courtesy Light control
- Remove the opener controls cover.
- Press the CODE SET button twice.
- The LED will illuminate and the light will flash.
- On the transmitter, press and hold the chosen button for 3 seconds, release, then hold for 3 seconds, and release.
- Release all buttons, refit the cover, and test.
2) Coding a transmitter button for Vacation Mode (remote lockout)
Vacation Mode disables normal transmitter operation (useful when away).
To code a button for Vacation Mode:
- Remove the controls cover.
- Press the CODE SET button three times.
- The LED will illuminate and the light will flash.
- On the transmitter, press and hold the chosen button for 3 seconds, release, then hold for 3 seconds, and release.
- Refit the cover.
To use Vacation Mode (after it’s coded):
- Turn ON: hold the Vacation Mode button for about 4 seconds, then release.
- Turn OFF: press the Vacation Mode button, then test another normal remote button to confirm door operation returns.
3) PET (Pedestrian) Mode (partial opening from closed)
PET mode opens the door from the closed position to a preset “partial open” height, allowing a pet or parcel to pass under.
Step A — Set the PET position
- Remove the controls cover.
- Hold CODE SET and close the door to the desired PET position.
- Hold the + button for 6 seconds until both OPEN and CLOSE limit LEDs are lit.
- Release, refit the cover.
Step B — Code a transmitter button to PET mode
- Remove the controls cover.
- Press the CODE SET button five times.
- The LED will illuminate and the light will flash.
- On the transmitter, press and hold the chosen button for 3 seconds, release, then hold for 3 seconds, and release.
- Refit the cover and test.
Troubleshooting (Most Common Issues)
Use this table to diagnose typical problems.
| Symptom | Possible cause | What to do |
|---|---|---|
| Opener doesn’t work from the transmitter | No power to opener | Plug a device of similar voltage into the power point and confirm power is available |
| Transmitter battery flat | Replace CR2032 battery | |
| Transmitter not coded | Code the transmitter button to the opener | |
| Transmitter not Tri‑Tran+ compatible | Check transmitter has grey buttons and the model number shows V2 (contact dealer if unsure) | |
| Vacation Mode enabled | Turn off Vacation Mode | |
| One transmitter works but others don’t | Flat battery or faulty transmitter | Replace battery; if still faulty, replace transmitter |
| Motor runs but the door doesn’t move | Opener disengaged | Re‑engage the opener using the manual release |
| Transmitter range varies or seems restricted | Normal variation due to conditions (temperature/external interference) | Ensure you can see the door; aim transmitter through windscreen |
| Battery exhausted | Check transmitter LED status and replace battery if flashing/no light | |
| Opener light doesn’t work | Courtesy light LED failed | Contact dealer to organise LED replacement/service |
| Door reverses for no apparent reason | Environmental conditions (windy/dusty/extreme temperature changes) can trigger obstruction sensing; Safety beams (if fitted) may be obstructed/misaligned | Ensure the door runs smoothly; check beam path is clear and beams are aligned |
| Door stops or moves very slowly | Door in poor condition (e.g., springs may be broken) | Stop using the opener; check door operation and call for service |
| Door slow/erratic when Battery Back‑Up is fitted | Back‑up batteries low or not charged | Restore mains power and allow batteries 24–48 hours to reach maximum charge |
Safety Testing (Recommended Checks)
If your opener has been installed and set up correctly, periodic safety testing helps keep operation safe and reliable.
Test the close cycle (obstruction reverse test)
- Open the door using OPERATE or the transmitter.
- Place a piece of timber approximately 40 mm high (or a similar object) on the floor directly under the door.
- Close the door.
- The door should strike the object and re‑open.
- Remove the object.
If the door does not re‑open when obstructed: discontinue use and arrange service. Do not use a door with faulty obstruction sensing.
Test the open cycle (stop test)
- Close the door.
- Open the door.
- When the door is approximately halfway open, firmly grab the bottom rail — the door should stop.
If the door doesn’t stop readily when opening (or doesn’t reverse properly when closing), place the opener into manual mode and contact service support.
Test manual door operation
Disengage the opener and operate the door by hand:
- The door must operate smoothly by hand.
- The force required at the bottom rail should not exceed 20 kg.
Caring for Your Opener (Maintenance & Servicing)
Preventative servicing of your garage door and opener is important because the door system contains many moving parts.
Servicing schedule guidance
- B&D recommends servicing your garage door and opener once in the first 12 months, and every two years thereafter.
Ongoing care tips
- Keep the door moving freely and smoothly (a poorly balanced door increases strain and can trigger safety reversal).
- If the opener indicates service is required (SERVICE LED), arrange inspection/servicing.
- If you notice unusual noises, jerky movement, or repeated reversing, stop and arrange service before damage occurs.
Technical Specifications (Roll‑A‑Pro RDO‑1V3)
- Rated voltage range: 230–240V
- Rated frequency: 50Hz
- Maximum door opening height: 3.25 turns of drum wheel (approx. 3000 mm)
- Maximum door area: 15.0 m²
- Maximum door weight: 110 kg
- Minimum side room: 41 mm
- Rated temperature range: +5°C to +40°C
- Rated load: 350N
- Short term peak force: 500N (50 kg)
- Nominal force: 200N (20 kg)
- Receiver type: Multi‑frequency
- Receiver storage capacity: 8 × Tri‑Tran+ 4‑button transmitters
- Coding system: Tri‑Tran+ technology
- Coding type: Non‑linear encryption algorithm
- Number of code combinations: Over 100 billion random codes
- Transmitter battery: CR2032 (3V)
- Courtesy light: LED
Operational note: In areas with very strong winds, intermittent operation may occur because wind pressure can trigger the safety obstruction detection system.
Frequently Asked Questions
What doors is Roll‑A‑Pro designed for?
Residential roller doors, including B&D roller door models such as Roll‑A‑Door and Rollmasta.
How many remotes can I program?
Up to 8 transmitters (Roll‑A‑Pro).
What battery does the handheld transmitter use?
1 × CR2032 (3V).
How do I add a new remote?
Use the “Coding a remote from the opener” process:
- press and release CODE SET, then press/hold the transmitter button (3 sec) twice.
How do I remove access for a lost remote?
Erase all transmitter codes, then re‑program only the remotes you still have.
Why does my remote work better when aimed through the windscreen?
Vehicle structure and surrounding materials can affect reception. Aiming through the windscreen is a recommended operating method.
Why would the door reverse for “no reason”?
Safety sensing can be triggered by environmental conditions (wind/dust/temperature changes), door friction, door condition issues, or misaligned/blocked Safety Beams if installed.
Do I need Safety Beams?
The opener includes built‑in safety features, but Safety Beams are strongly recommended as an added layer of protection, especially for families with children, pets, or valuable items in the garage.
Copy-Paste “Facts Summary” (Accurate Roll‑A‑Pro Highlights)
- Roller door opener with 500N motor (peak force)
- Soft start/stop to reduce stress and support quieter operation
- Automatic LED courtesy light
- Built‑in safety: Automatic Reverse and Automatic Backdrive
- Secure access: Tri‑Tran+ coding, non‑linear encryption, 100+ billion random code combinations
- Typical kit includes 3 × TB‑7 transmitters + visor clip
- Supports up to 8 programmed Tri‑Tran+ 4‑button transmitters
- Transmitter battery: CR2032 (3V)
- Suitable (guide limits): up to 110 kg door weight and 15.0 m² door area (door must be well balanced and smooth by hand)
- Recommended service interval: within first 12 months, then every 2 years
Product Data (OpenAI Spec)
View Full JSON Spec ↗Specifications
| Condition | new |
|---|---|
| Category | Home & Garden > Garage Door Openers |
Product Intelligence
Roll-A-Pro Opener: Roller Door Automation System
Overview
The Roll-A-Pro is a rolling door opener system manufactured by B&D Doors designed to automate the opening and closing of residential rolling garage doors. It represents a complete motorized solution for residential garage door automation with comprehensive safety and operational features.
Technical Specifications & Features
Door Compatibility & Capacity
The Roll-A-Pro is engineered for residential rolling door applications with the following specifications:
- Maximum Door Weight: 110kg
- Door Type Compatibility: Designed specifically for rolling garage doors in residential settings
- Operational Range: Suitable for single and double residential rolling doors within the weight capacity
Remote Control System
One of the key features of the Roll-A-Pro is its advanced remote control programming capability:
- Remote Control Support: Up to 8 programmable remote controls can be stored in the opener's memory
- Remote Programming: Users can program multiple remote controls to operate the door, allowing convenient access for multiple household members or authorized users
- Operational Control: Remote controls enable wireless door operation from a distance
Warranty Coverage
The Roll-A-Pro comes with comprehensive warranty protection:
- Warranty Period: 5 years
- Warranty Coverage: Covers manufacturing defects and normal operational issues
- Operating Cycle Guarantee: The warranty is valid for up to 10,000 operational cycles (opening and closing combinations)
User Interface
The system features intuitive operational controls with clearly defined functions for user convenience and safety during daily operation and maintenance.
Application
The Roll-A-Pro is designed as a quick operation rolling door opener system with user-controlled functions, making it ideal for homeowners seeking reliable, convenient automatic garage door operation with flexible programming options.
References
- [1] easylifter-rdo-post-2006.pdf
- [4] 161082_00-online-quick-setup-guide-rdo-1-1.pdf
- [6] ata-rolling-door-openers-trade-reference-guide_low-res.pdf